L R Wicker Design
Playground for the Etsy shop of the same name…
First Commission Completed

Here you can see the final shaping on the blade before polishing and sharpening.
I recently completed a small knife and sheath for a friend. It’s the first commissioned piece I have made as a blacksmith and I am very pleased with the final item. It was also very gratifying to have my friend be so pleased with his purchase. The blade is made of spring steel from a coil spring and the sheath was made using high quality vegetable tanned leather with a bone bead and a hammered wheat ear penny. I made the penny into a concho by drilling and peening it to it’s final shape. I also dyed the leather thong to match the red linen stitching used on the sheath. Overall, it makes a very pretty presentation.

Here is the completed blade in it’s new home.
It took me about five attempts to get the sheath to look good and function well. I guess it ended up costing a bit more in time and effort than I expected, but in the end I was very happy to present it to my friend and that was really more important to me than making a profit. I now have a much better idea about how to properly build a usable sheath for upcoming projects as well. I am currently working on a similar blade to enter in our forge groups annual fundraising auction at the Bluebonnet Demo.
Thanks for dropping by and keep on forging!!
Ready, Set, Hammer!

Kainon and I made a set hammer at the Pioneer Farm Museum Spring Break event in Fredericksburg.
Here is a little set hammer Kainon and I cranked out at the Pioneer Farm Museum on Wednesday. We started the day with the obligatory nail making workout. It was fun trying to get a nail done in one heat. Kainon had three irons in the fire at one point and was trying to top his personal best time and nail formation. I mostly made tacks. I was having a serious issue with the height of the anvil, even though Kainon planned ahead and brought a cut down pallet to stand on while working.
We entertained quite a few folks with our smithing skills, the kids were all keen on getting a still warm nail fresh from the forge. We also managed to reset the blower with some large hooks driven into the floor to keep it from tipping every time it was cranked. The weather was just amazing and the forge was working great. Since we were there for the day, I had a strong feeling Kainon might decide we needed to do something a bit more fun and I was right.
He had brought a small knife sample he worked up with him and began telling me how much a set hammer would help with making the plunge in front of the ricasso. He then pointed out that he had all the tools we needed to make one and a suitable piece of stock just happened to be in the shop. So, we went on and made the hammer. It was actually very easy, Kainon was able to forge most of it alone and only needed me to assist with some holding of the flatter and such. I think it turned out very well and we both felt we accomplished a “forged to finish” tool as Brian Brazeal is fond of saying. Kainon is going to grind the striking end a bit and put a handle to it so we can give it try at the Zilker Botanical Forge in the near future.

The other side of the set hammer has the plus sign I use for marking tools.
I hope to be able to post some knives soon that bear the marks of our new little hammer. As always, thanks for dropping by and keep on forging!!
Getting Edgy At Zilker

The finished edge tool in place in the hardy on the smaller anvil at Zilker.
Kainon and I created a new edge tool at Zilker the other day. We used a piece of a jack hammer bit for the stock and had what Kainon characterized as a ‘relaxed’ bit of striking and directing.

Side view of the edge tool in place on the small anvil.
We began by forming the taper and then cut the waste away from the billet. Each time we heated the billet we cooled the top in water to prevent it spreading and to confine the upsetting to the shoulder area. Once the billet was shouldered correctly we continued to flatten the top and maintain the hexagon shape from the original bit billet. The final step was to take the flatter and give everything a final squaring and flattening. The proper orientation of the tool in the hardy is marked since this anvil has a very oddly shaped and bent hardy hole. If the tool is inserted in any other direction it won’t seat properly.

The tool is marked to provide the user with the means to insert it in the right direction on the anvil.
Now we can make more rings and small items without having to worry about finding a good edge on the anvil. Plus the small width makes it possible to round and reverse taper fine stock easily.
Thanks again for dropping by and check back soon for hammer making pics. Yep, we finally got one done and I am getting ready to show it off!
I Gave My Awl…

After the heat treat and quench I gave the awl it’s final temper.
I recently decided to see if I could create a replacement for my twenty five year old ice pick/awl. I bought it in Chinatown, NYC for a dollar and ninety eight cents and it has served me well since. I have used it primarily to punch holes in paper for bookbinding, but it has also been pressed into service recently to mark metal. I thought I might want to save my original the extra wear and tear, paper being a rather cushy job all these years, and the forging of such a fine taper is a serious challenge.

The square back end of the awl is tempered to be softer than the tip. This will provide a little flex and prevent it breaking in use.
I started with a piece of garage door opener spring and straightened small section. I then used my rounding hammer and the tapering technique I learned from Brian Brazeal to create a very long and even taper. I was pleased with the speed and ease of producing a fine taper with this technique. I was also surprised to find the taper was very even and the whole piece very straight without a great deal of fine tuning. I chose to leave the back end square, I may decide to set it in a handle with a brass collar and the shape will prevent the end from spinning in the wood of the handle.

The point is very sharp and still very hard, perfect for marking materials.
I used progressively finer sand paper to grind the final finish on the whole length of the piece and made the tip quite sharp. I then heat treated and quenched in oil, olive oil in this case. Once the awl was cleaned up and I gave it a final polish, I tempered it to a blue at the back and up to straw to the tip. This should help prevent the awl from being brittle and possibly breaking in use. In truth, the awl will likely see light duty and never be struck like a center punch so the tempering is not really all that necessary. The final touch was to sharpen the tip to a super fine point.

Here is the completed awl. I plan on using it for marking metal, like copper for instance, prior to cutting or drilling.
I had such a good time making this one I made two similar pieces almost immediately. I am planning to give them as gifts to a couple of friends when the season or birthday celebrations permit. I think this is one of my all time favorite projects and I am really starting to get the hang of tapering fluidly and easily. I always like to be able to produce something when I am practicing skills, I am sorry to say I get distracted easily when working if the goal doesn’t keep me engaged. In this case, I can see myself making a wide variety of lengths, diameters, and point shapes just for fun.
As usual, thanks for dropping by and have fun at the forge!!
2012 in review
The WordPress.com stats helper monkeys prepared a 2012 annual report for this blog.

Here’s an excerpt:
600 people reached the top of Mt. Everest in 2012. This blog got about 7,300 views in 2012. If every person who reached the top of Mt. Everest viewed this blog, it would have taken 12 years to get that many views.
Click here to see the complete report.
My Hammer Has A Handle
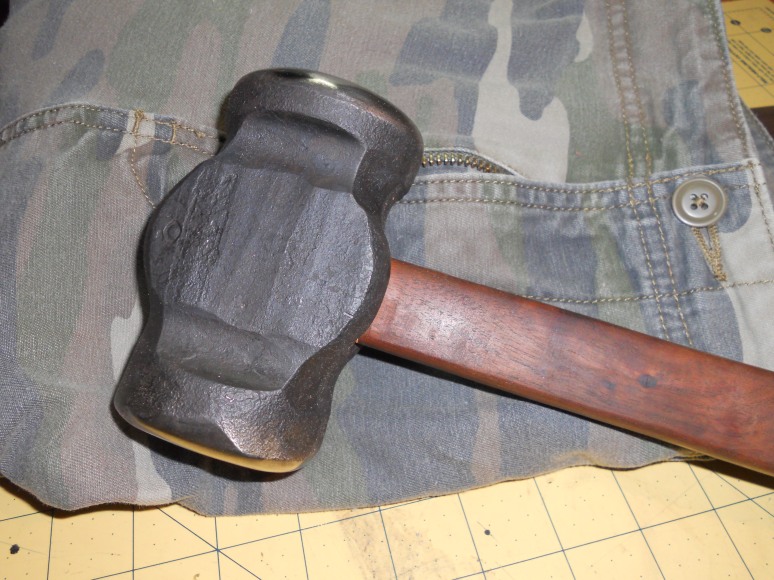
I got the Ipe wood handle for my big 5 pounder finished.
I got the handle completed on the big 5 pound hammer Kainon and Brian made for me earlier in the Fall. I was lucky to score a free piece of Ipe wood at one of the Balcones Forge Organization meetings and I used a strip I cut from that to make a really nice handle. The wood is dense and heavy, the perfect material for a hammer handle.

I made a wedge out of some Texas Ebony to complement the Epe handle.
The wedge is made of Texas Ebony, which in this case is very light colored. The scrap I have is mostly black, this thin slice is the only light bit in the piece. I had not heard of this particular type of wood until recently when I bought it at Woodcraft Supply here in Austin. The ebony is very dense and hard, has a tight grain, and doesn’t split easily, making it a good choice for the wedge. Kainon made a couple of metal wedges at the forge and I used one of those to complete the handle.

The finished hammer is a work of art in itself.
I finished the handle with some linseed oil and fine sanding to make it very smooth and splinter free. There is nothing like catching a splinter in the hand from a poorly finished handle. The shape turned out very well, I tapered it back to make gripping it easy, the size is perfect for spinning the hammer to access the faces as needed. Even though it weighs in at about 5 pounds, the handle makes using this guy a breeze. I have already forged a few pieces with this hammer and I am getting better every time I visit the forge.
I just love the way this hammer works, I could not be more pleased with the final product.
I will be heading to the forge tomorrow to play a bit more with my new hammer, wish me luck!
Thanks as always for dropping by and have fun making stuff with fire and metal!!
Keeping My Notebooks Covered

The two new Moleskine covers I made and the linoleum cut I used to create the embossed image.
I spent a few hours making a cover for my small Moleskine a couple of weeks ago, you can see it on the left above. I was pleased with the result so I went on and made a second, larger version for the medium size Moleskine as well. I also made a linoleum cut to emboss the cover as an experiment to see if I could get a good image using the unmounted linoleum as a blind plate. I think it turned out well enough to pursue it a bit more. I actually stood on the lino cut to get the impression into the wet leather, so I am certain if I used a press it would be even better.

The interior of the cover showing the pocket holding the cover of the notebook.
I left a good bit of room around the notebook so the cover would be able to slide a bit when the cover is opened and closed. I had an issue with the smaller version that was a tighter fit. The cover of the notebook didn’t slide well and sometimes would prevent the cover closing smoothly. You can also see the red hemp thread I chose for sewing the cover together. I like using a bit of color against the leather and the hemp thread comes in many nice colors.

I also used my old lead type to emboss my initials into the back pocket.
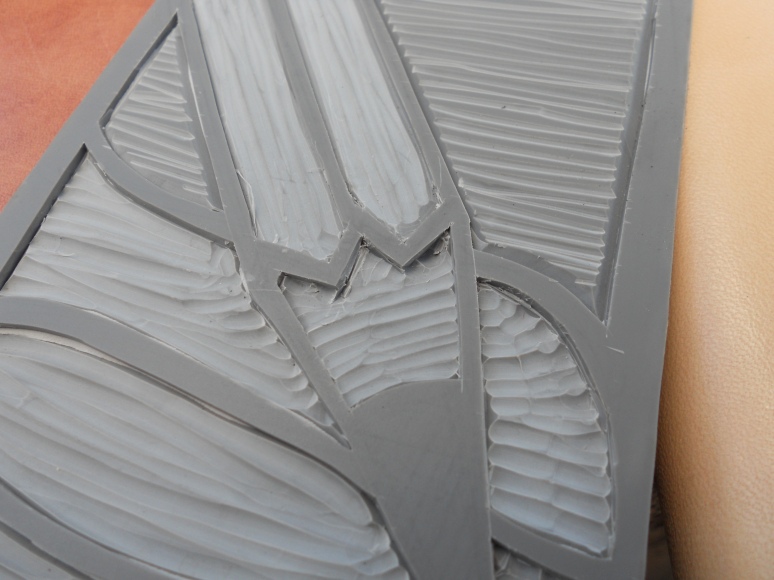
I used my Japanese block cutting tools on this linoleum cut. I was able to crank this out in about 30 minutes.
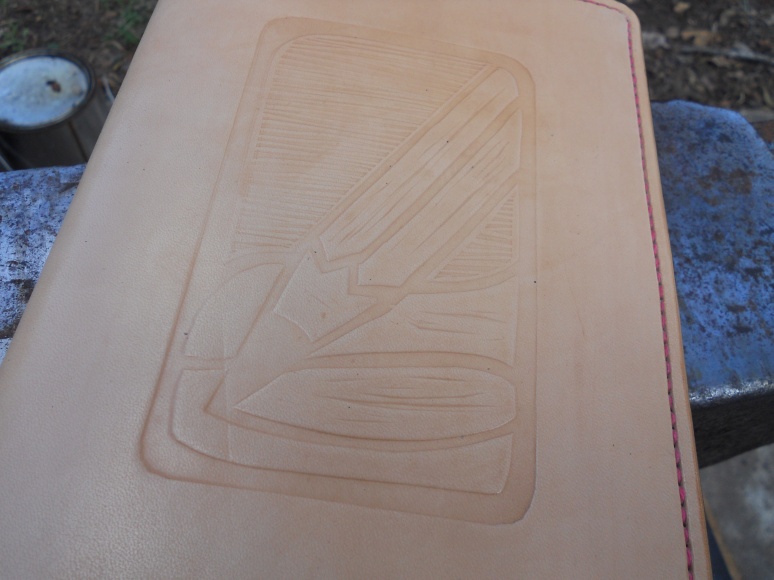
The detail from the linoleum cut has transferred very well to the leather.
I soaked the leather for the front cover in water for about a minute and then applied the linoleum cut, placed a small sheet of plywood on top and then stood on the whole thing for a bit. This was sufficient to make a good impression of the linocut in the leather. I then let the cover dry well before attempting to do anything else to it. I sewed the pieces together, applied Atom Wax and Edge Cote and that was about it. I am very pleased with the result and I think I will make a few more linoleum cuts to play with to make some more covers.
I am thinking about trying to use the laser cutter at TechShop to cut the leather for the covers so I don’t have to do the work individually. I am trying to draw up the template in Corel Draw, we shall see if I am up to the task. I haven’t spent a lot of time with Corel so it may be a challenge. I will update with success or failure.
As always, thanks for dropping by and have fun!
I Need A New Bag…

New tool tote for my most used tools in all my many pursuits.
…like I need a hole in the head. But that has never slowed me down in terms of buying and trying to find the Holy Grail of tool bags. I have a left a long, twisty trail of my earlier bids at tool Nirvana behind me in this endless pursuit. If you, like me, have an unquenchable thirst for things to contain other things, things to organize other things, things to carry other things, or things to do all these things to other things; then Veto bags might be something you should consider.
I have amassed a huge selection of tools and equipment over the years, my garage stands as testament to this. At this time my two car garage might just be able to house a single vehicle in an emergency if I piled some piles on top of one another and shoved everything to one side. Maybe. This is even with some organization, I imagine without any organization it would be impossible to get even a bicycle in there if hard pressed. So, I box, bag, cabinet, bucket, shelf, etc, my many, many tools and other necessities to make them somewhat easier to find and use when needed and then stash away to be found if needed again in the future. This is all well and good when I am working locally in my home or yard, however, when I must hit the road and take myself and my tools somewhere else, things get a little scary. I have found a few key items that make travelling with my gear a little more fun and a lot less hassle.
Now that I am running to school and TechShop frequently I decided it would be nice to have a belt kit that I could pack with the really bottom line essentials for most of my work. I started on a quest for the perfect container and luckily ran across the Veto TP3 at Woodcraft Supply here in Austin very quickly and immediately fell in love, or at least lust. Originally designed for HVAC workers, the TP3 is meant to house a meter and the hand tools generally used in the field. It features 19 pockets of various sizes for tools, a front Velcro flapped pouch, multiple D rings and a clip-ended strap to hold tape. The back has a heavy-duty clip to attach to other tool bags or your belt and the top is a heavy-duty leather loop that can slide over the belt of your choice for hip placement. There is also a very durable rubber molded handle strap that can be attached to the side D-rings allowing one to carry it in hand and it will stand on its own empty or full in this configuration. I love that last bit, I can’t tell you how much I like putting down my tool bag and not having to lunge after it as it tips over because I have packed in something top-heavy.

The front pocket also features loops for small tools and pencils as well as a small area for something flat, like a camera or business cards.
The front pouch is a bit small for anything more than my business cards or small camera, but that’s okay with me. I have also used it to hold short items like a center punch and a Torx key set on occasion as well. In the photo above it is housing a short mechanical pencil since I am using the camera normally hanging out in there.

The back has a burly clip for your belt and the brown leather loop up top can be slid onto the belt of your choice for cowboy style hip positioning.
The back is rigid and the clip is riveted on, the leather loop is riveted as well to reinforce the stitching. You can see the attention to detail in the fit and finish of the back, this is the side most folks care little about but these guys have gone the extra mile and made it as durable and well-designed as the rest of the bag.

The hard rubber handle attaches to the side D-rings for easy carrying in hand.
The rubber handle is molded to the nylon strap and attaches at the sides with clips making it easy to remove or re-attach as needed. I used the side area to clip my measuring tape on, saving lots of room inside and giving me easy access to it. I also slid a thumb drive in one of the pockets with a long leash so I can leave it attached while it sits near the computer.
I have stuffed this little guy with pliers, hemostats, a tape measure, small and large screwdrivers, heavy-duty scissors, and a couple of other odds and ends I find I am always looking for and I still have a bit of room to wedge in few more items if I need too. The only quibble is the high price, but once you look at the quality of the bag and the durability, the price doesn’t seem too bad at all. I paid about $45.00 for this one at Woodcraft, but it can be had online at a lower price. For me, it has proved its value, I suggest getting a close look at one of these if it seems like a good fit for your work style. I guarantee you will be impressed and you may find you, like me, can’t resist this fetching little tool carrier.
Be sure to check out my Etsy shop for new items and drop back by to see what’s up!
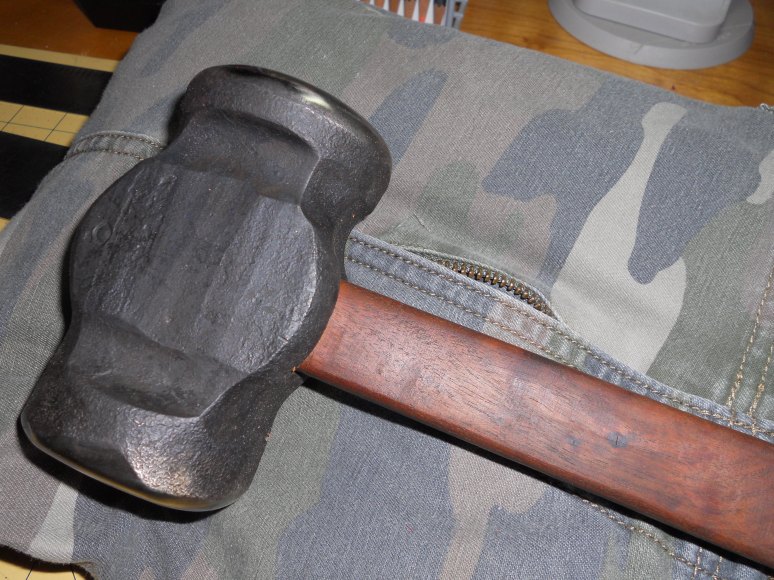
Heat Treated and Tempered: My New Hammer

The hammer head enveloped in flames.
You can see in the photo above the shape of my new five pound Brian Brazeal hammer. My friend Kainon and Brian made it for me recently and Kainon and I, mostly Kainon, heat treated and tempered it today. It was amazing to watch Kainon work so confidently at the forge. He has really learned so much from Brian in the past few months that I can’t help but be impressed. His skills have become second nature and I know he has made the right choice in his desire to become a master Blacksmith.

Kainon juggling all the variables to make a perfect hammer.
The challenge with heat treating such a large hammer is in keeping the heat even throughout the entire piece and in getting it quenched quickly and evenly. You can see the intensity of the flames Kainon is facing as he carefully positions the hammer and continues to pump the fire at the same time.

The hammer must be turned to keep the heating even.
As you can see above, it takes a bit of determination to flip the hammer in the forge. Kainon is concentrating on getting the bottom of the hammer well seated in the coal bed to keep the hammer upright and heating evenly. He must then continue to pump the fire and watch the heat to be ready to flip it again as soon as the bottom comes up to temperature.

Kainon prepares to quench the hammer in a large bucket of water.
Kainon has gotten a good grip and is ready to turn and quench the hammer. We set a large bucket of water nearby for this purpose. He must move the hammer constantly to cool it evenly or it may crack. Once the hammer is in the water it begins to “scream’. This is a high pitched whistle that gradually dies out as the temperature of the metal cools down.

Kainon has to rapidly move the hammer up and down within the bucket to quench the hammer evenly and quickly.

Kainon’s mark on one side of the hammer.

Brian’s mark is on the other. I am one lucky gal to have such a fine hammer!
Now that the hammer is fully hardened, we can heat the drifts and temper the faces. We had to do a bit of futzing around outside the shop to do this so no pictures could be taken. The process is fairly simple, you insert your heated drifts into the hammer and watch carefully for the temper to move into the face. It is a very important step and we needed all our concentration to get it right.

You can see the golden color left in the face of the hammer once it has been properly tempered. Kainon hit it just right on this piece.
Although the shot is a bit out of focus I included it because the temper color is so spot on. Kainon was able to get the hammer heat arrested at just the right time for a perfect temper on the face. Now the head is less hard near the eye and still very hard at the faces, exactly what you want with a forging hammer. If you scroll up to the quenched state above and then back to this photo you will see the blue tone to the center and the gold tone to the faces very clearly.

Kainon really gave it a good tryout and made a taper.
We both gave the new hammer a quick tryout without a handle. It was mainly because Brian has mentioned that he has done this sometimes to get the right hit for a piece he was working on. He also reminded us that in the very distant past, humans didn’t put handles on their tools and often hammers were simple stones held in the hand. It was funny but we actually were able to hit the work well with just the head. Kainon even got a decent taper out of his piece.
Once again, I have to say “Thanks!!” to both Kainon and Brian for taking the time and making the effort to make me such and awesome hammer.
Drop by again soon and keep on having fun!
All Around The Webernets
Verified Services

